Because you haven't to be a video technician
to obtain good results…


The major module: Encoding
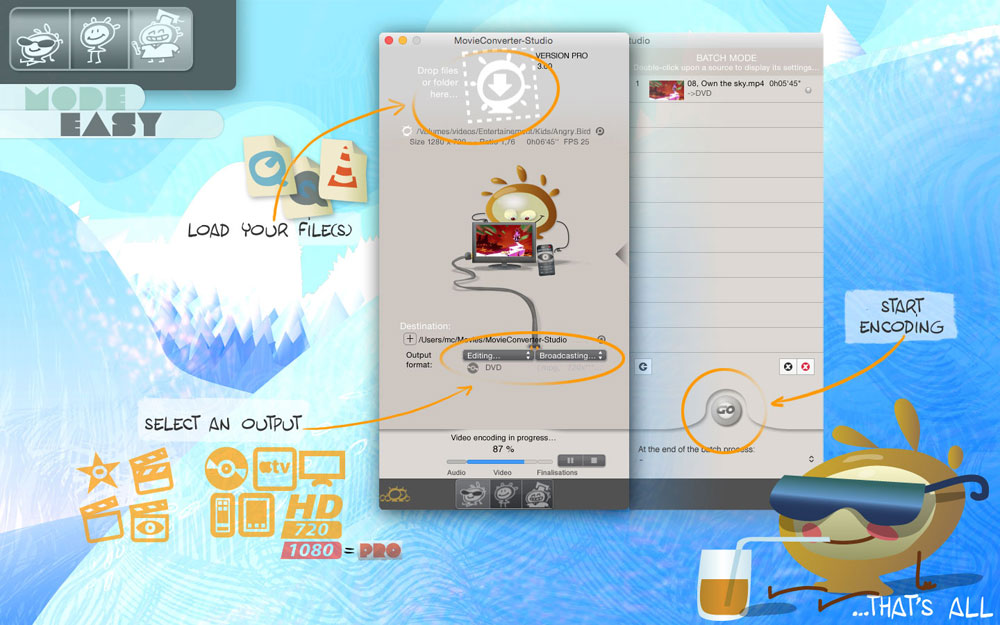
The main window: Encoding (mode "easy / beginner")
 Videos Loading

Drag and drop one (or more) video(s), or un folder with videos inside, onto the MovieConverter-Studio's icon.
Notice: You can drag'n'drop these files onto MovieConverter-Studio's icon in the Dock too ;-).
 Output Formats
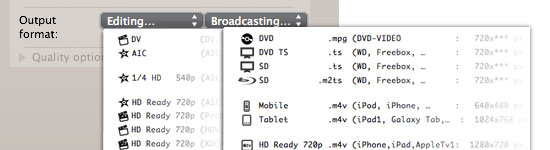
MovieConverter-Studio offers to you most of the standardized output formats. They are classified according to their use:
- Editing video (iMovie or other).
- Broadcasting video (whether on DVD, Tablet, on multimedia hard disk, etc).
Select the format that fits your needs, e.g.:
- You want to edit the video of your just-born-niece into FCPX? …Choose an High Definition 'ProRes' output.
- Want to send a video to Granny? …Make a DVD, to play it onto her home DVD player.
- You want to show a video to your officemates? …Choose iPhone output to show it from your mobile phone.
- Want to see the video of your last vacation on your living room TV? …Select an output for High Definition TV.
The right side: Batch (all modes)
 Load again a stored video, in the main window
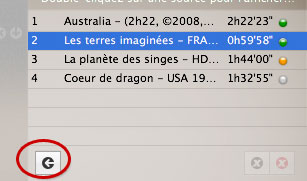
Every video you will encode is stored in the right panel. If you want to modify its settings or just consult them:
- Double-click onto the row of your stored video
- or select the row of your stored video and click onto the "arrow" button
- …and the stored video will be loaded again in the main window.
Notice: If you change settings0 do not forget to validate them (click onto the "+" button ;-)).
 Remove one (all) stored video(s) in the Batch mode
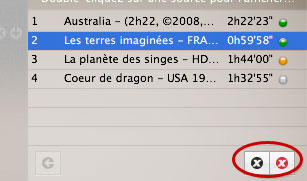
Remove one or all videos (already stored for encoding purpose):
- Select the row of your stored video and click onto the "black cross" below, to remove it from the Batch Mode.
- Click onto the "red cross", to remove all stored videos from the Batch Mode.
 Launch the Batch mode
 Click onto the "Go" button to start the Batch Mode.
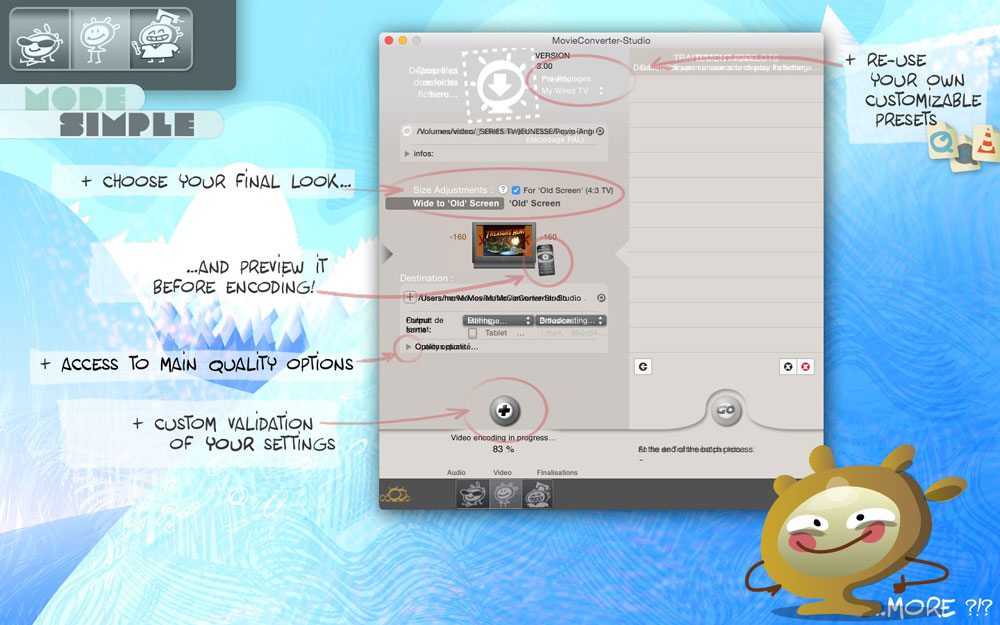
The main window: Encoding ("simple" mode)
 Presets
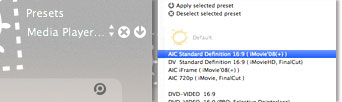
Presets allow you to:
- Not having to redo the settings for each video loaded, simply apply them again.
- To load multiple videos at the same time (and your settings will be directly affected).
Presets are customizable, according to your needs:
- Load a video
- Make your settings: mainly choices Size Adjustments and Output Formats (but you can also include "expert settings" as Force framerate, decoding, "comb effects", etc).
- When you are satisfied with your settings, store them (menu 'Presets'> 'Create new preset…'). And name it to the most explicit way for you. That's all!
- To apply this pack of settings to another videos, select the preset and load new videos, or click the arrow (near the preset name) to apply the preset to an already loaded source (and do not forget to validate your new encoding settings by clicking the "+" button ;)) .
Notice: If you regularly use a preset, select it as default (in the Preferences panel) so, it will be automatically loaded at each start of MovieConverter-Studio.
Notice: MovieConverter-Studio is only provided with a few presets, but you can create as many presets as you want ;).
 Source's informations
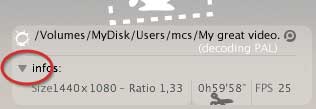
Fold the triangle (click onto the triangle button) to access to additional informations about your video:
- Its size (length x width) in pixels.
- Its ratio Width : Height (e.g.: an "old square screen TV" had a ratio of 4:3 = 1.33. A recent television ratio is: 16:9 = 1.77). This information can help you to identify what Size Adjustments choice is the most suitable for your video.
- Its duration.
- Its number of Frames Per Second (FPS). E.g.: a 25 fps video is ready for broadcasting in Europe, 30 fps for the United States, and at 24 fps for cinema.
- Scissors button: to cut the beginning of your video (e.g.: if it included a preliminary program that you do not want to keep). Internet is full of legal videos. Free but you often have advertising introductions before the video. And if your video is a trailer from the United States, you must always bear about a 4 seconds "Parental Guidance" panel :-( These pre-programs bore me, this tool will allow you to cut them :-)
Notice: If your source file is QuickTime compatible, it will be displayed (to determine where is the place you want to cut). If your source file is not QuickTime compatible, you can still cut the introduction, but in a "blind mode".
 Size Adjustments
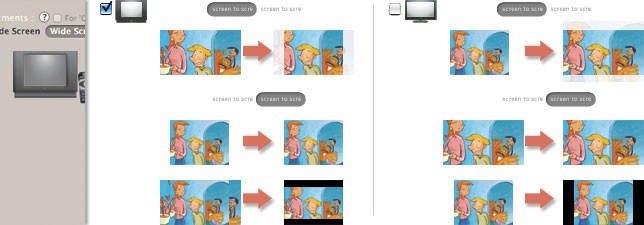
This option fit the size of your source file to your target size:
- Convert any video to 16:9 (although originally it was a 4:3 video). By adding (or not) some black borders if necessary.
- Allows you to put your video in full screen (whatever its original size or its comb effects, or forcing its final size display.
MovieConverter is not bad, it tells to you exactly what it will do, how it will handle your video:
- By adding black borders or not (and tells how many pixels will be added)
- By cropping or not (and tells you how many pixels will be cropped)
- (and informs you about the resulting size -in pixels too- for compliance with the aspect you have chosen).
Notice: You have not to provide a "compatible size" source file, EVERY source file can be processed by every aspects.
Special cases: Your video may be sometimes displayed in several different ways (e.g.: DVD videos or TV recordings, they have the shared pixel size but the resulting video could be displayed as 4:3 or 16:9).
- With complex videos (such as an anamorphic video), MovieConverter Studio notifies you and allow you to select more precisely the right size adjustments.
- And with simple videos? So, no alert, no need to spend time for a so simple size adjustments ;).
Notice: The displayed alert seems too technical? …Click onto the default button (most of time it will be the right one ;)). And do not forget to check the result of your choice by clicking onto the Preview button.
 Preview

Video encoding is a slow operation, check before conversion, your destination will well have the look you hoped :-)
Click onto the remote control to preview your Size Adjustments choice (so, according to your setting).
Notice: Output compliancy (whatever the output format, PAL or NTSC) and synchronization are MovieConverter's job, only check that the Size Adjustments setting you have chosen is the appropriated one.
 Destination
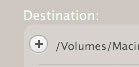 Select your destination folder (where your video will be converted).
 (Expert) Quality options: speed
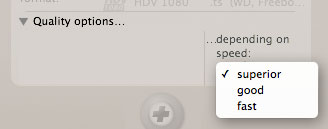
The quality of your conversion depends on many parameters. By default MovieConverter-Studio imposes minimum settings to get acceptable quality.
But you can still affect the quality, depending on the 3 'quality choices':
- Superior: Prefer quality to speed (slower but better, optimized compression).
- Good: To encode with an acceptable quality/speed ratio.
- Fast: Prefer speed to quality :-(
Your choice will affect:
- How is analyzed the contents of your source…
- …to produce an more accurate and optimized encoding depending on your video target.
 (Expert) Quality options: bitrate
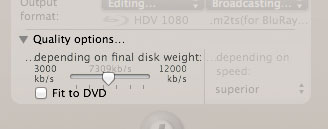
This quality option is not available everytime:
- You only see it with some output formats.
- And if you do not see it with the format you selected? …This is because you do not need it (e.g.: videos for editing have directly the best quality available ;)).
This option lets you choose the quality according to the 'bitrate'. The 'bitrate' is the "amount of space allocated on disk to describe all the images in one second of your video". In summary, to adequately describe a video, you have to leave it the place enough…
Example with "literature": (sorry, I'm not an english native speaker)
- A minimum bitrate would be: "The scenery was beautiful".
- A normal bitrate would be: "The scenery was beautiful : furrows, rolling fields, a row of oak trees lined every boundaries".
- A high bitrate would be: [everything that has been said before) + "Two little birds chirping on the lowest branch of the tree near to me [etc]".
With the above example, the text will be longer or shorter depending on informations (bitrate) you want put in, in exchange, the 'resulting book' requires more or less pages (or more Megabytes on your hard drive, if we talk about video).
Notice:
- If you do not allocate enough space enough to describe the contents of your video, your video has to be too much compressed (you obtain artifacts or at best a loss of details).
- If you leave enough space to describe the contents of your video, no need to be too much compressed :-).
- And if you leave more space than necessary? Well, it will not help, from the example: you get the same book but written with bigger characters and so, occupies a lot of extra pages (for nothing ;)).
Notice: MovieConverter-Studio determined for you, the minimum and maximum bitrate appropriate to each output format:
- Minimum bitrate value: Below, it would damage your video contents.
- Maximum bitrate value: Above, or it does not increase the quality, or your output format specifications forbidden to exceed this limit ;).
In conclusion, what is the best bitrate value? …Nope, there is no answer: a "video of the garden on a moonless night" does not need a high bitrate, but a "video from a daytime outing in the forest" will need a higher bitrate to keep all the details of foliage. There is no perfect setting, this option is there to allow you to weigh yourself the quality according to the contents of your video versus the disk space you allow to it.
 Validate your settings…
Click onto the "+" button to validate your settings (they be stored in the right side, in the Batch Mode).
Notice: if you modify settings but do not validate them, si ils will be discarded during the conversion of your video ;).
Notice: if you first selected a Preset, tour video was directly stored into the Batch Mode panel (…and one needed click less ;-)).
The left side: the Expert Options (mode "expert")
 Force framerate
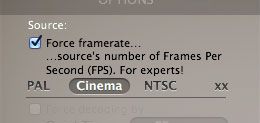
3 different reasons to use this option:
- To correct the duplicated frames added by a buggy alternate encoder. E.g.:
- YouTube does not always like 'cinema' videos (24fps), it often encodes them as NTSC videos (30fps) = add 6 duplicated frames every second.
→ Force Cinema setting to remove the duplicated frames. - You mistook and edited your PAL (25fps) videos in an iMovie project with an 'NTSC setting' (30fps). iMovie will add 6 duplicated frames every second.
→ Force PAL setting to remove the duplicated frames.
- YouTube does not always like 'cinema' videos (24fps), it often encodes them as NTSC videos (30fps) = add 6 duplicated frames every second.
- It is possible (though rare) that MovieConverter does not succeed in determining the number of fps of your source file (or be caught out). This can occur the with complex videos with 'Variable FrameRate' (videos with a non-constant fps). You can specify manually the framerate you think is the best for your source file.
- Some source files (even more rarely) have a non-standard framerate (e.g. 26 fps). You can force and specify the new framerate to get the best results.
This options reads your input video and try to identify the duplicated frames. It isolates to remove them. So, your video recovers its original framerate :-)
Notice: a video with duplicated frames jerks and produce a not smooth result if you convert standard. So, correct it during conversion.
 Force decoding by
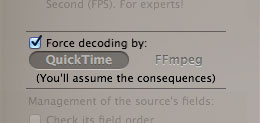
MovieConverter Studio includes 2 decoders:
- QuickTime (from Apple) is a registered format, creator of .mov.
- FFmpeg (from the Unix world) is, at the opposite, an open-source reader, multi-format and far versatile (…but do not expect the same decoding skills with .mov files).
QuickTime performs the best with .mov, FFmpeg performs the best with most of the remaining formats. Each one has its own weaknesses. The strengths lies in how they complement each other. MovieConverter Studio takes time to analyze your source, it determines the decoder 'which suits it best'.
- The check box is activated, it means the two decoders are compatible with your video.
- If the check box is not activated, it simply means that the other decoder is not compatible with your source file.
Notice: You can also check if the decoder is able to decode your source by choosing to preview the result.
 Management of the source's fields
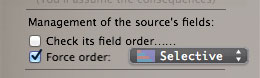
What are fields? See the chapter Understanding interlaced video.
An interlaced source file contains 2 different "images" (2 fields) in each frame, but which field has to be displayed first?
- If the field's decoding order is the right one, you'll see … the frames are displayed in the normal order ;-)
- If the field's decoding order is wrong, you'll see on your tv screen: frame 2, then the 1st, then the 4th, then the 3rd, and so on (you are in for a good headache!).
If you have seen the movie "Phantom of the Paradise" by Brian De Palma : the electrocution of the singer (the one named "Beef") is produced by an inversion in the order of the frames. It jerks, it vibrates, it's ugly :-) (But here, it is a matter of special effects. Avoid doing the same thing involuntarily).
The interlace information is supposed to be written inside the video.But some software forgets this information and some hardware indicates it incorrectly… MovieConverter Studio allows you to correct (or only check) the possible interlace mode of EVERY source file.
This tool has 3 main functions:
- Check the actual content of an mpeg stream (if by miracle your other encoding software has not yet damaged the fields of your source, they've certainly not taken care of marking this information).
- Make the distinction between truly interlaced content and a simple interlaced wrapping (see the chapter Understand interlaced broadcast).
- Enable you to have clean decoding of a source file encoded by badly adjusted software. This is done by helping you identify the field order of interlaced content within a progressive wrapping (thus theoretically without fields) in order that the resulting DVD (or DV) has no unceasing "comb effect" inside the frame. E.g. : Apple.com has put online several times some interlaced movie trailers into progressive wrappings (X-Men, A Scanner Darkly, …). After a few days, the movie trailer has been replaced by a "clean" one (always a progressive wrapping, but also with progressive content).
In some cases of standards changes (telecine) or appearance changes (from a 4:3 source file towards a 16:9 one), it's in your interest to check the content of a video tagged as interlaced.
- If the content of your video is interlaced, there's no problem.
- If only its wrapping is interlaced (progressive content), it will be in your interest to force the video decoding into progressive mode. You will obtain more quality by handling it in one large image instead of two half-images.
For more information, read the chapter Understanding interlaced broadcasting.
 Video noise reduction
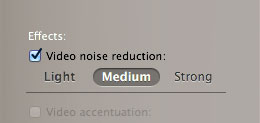
Noise suppression is to smooth the contents of the image while preserving its edges.
So, AND ONLY IF your video needs it:
- A poor quality video? Choose "Light".
- An old tired VHS cassette that you've digitized? Choose "Medium" or "High".
- A camcorder's video shot without light enough …so very noisy? Choose "Medium" or "High".
- A good source file? Do not check the option!
Note: The graininess of the film roll can be softened too. So, keep in mind that noise reduction can also be an information removal from your source file.
 Video accentuation
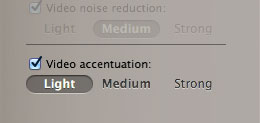
Your video is too 'soft'? Highlight its edges for a clearer video.
If your video was already sufficiently clear/detailed? So, do not use this option (sharpen will damage the image giving it an 'unnatural' look and feel).
Notice: You can use either the 'Noise Reduction' option and the 'Sharpeness' option: the first smooth out imperfections, the second accentuate the edges ;).
 Target standard
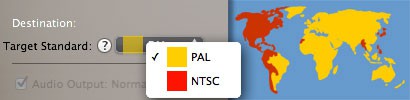
According to the geographical area where you live, videos must have the right size and the right number of fps.
A compatible video for the American territory's television (NTSC standard) is not compatible for the European or Australian television (PAL standard). To have a video play in the optimal way, you must convert the video into the standard of your country.
So choose your target 'broadcast standard' depending on your location… and MovieConverter automatically adapts your video to your location needs ;).
 Normalize
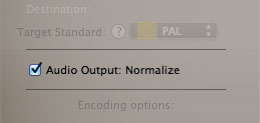
'Normalize' is an audio option, it does:
- Read the whole source file in order to calculate its range and its maximums.
- Distribute the range of the audio source file to conform to a normalized average loudness (as defined by the broadcaster channels).
In practice:
- 'Normalize' avoid saturated sounds. If your audio was not good enough: sounds will be clearer, distinctions will be lessened, your ears will be less stressed.
- Do not expect for a result as good as multi channels audio from commercials DVD or BluRay, but this option corrects an audio misconfiguration.
- The other advantage of 'Normalize' is that all your target files will have a sound level that is more or less constant. When playing several files (e.g.: from a DVD), you will not be obliged to play with the volume level of your remote control with every track change.
Notice: Technology (…for those who have "a good ear" or are curious): AC3 (or the A52 more exactly, used in DVD like Blu-ray) may be compared to mpeg2 video encoding, as it is composed with fields, like mpeg with GOPs. Each field contains 3 bits that indicate the amplification coefficient of the field, once decoded (a kind of mantissa, for the mathematicians). It is exactly these 3 bits which are more or less deactivated (at least, the induced effect…) when one sets the "dynamic range" of DVD's players or of the amplifiers which decode Dolby Digital. Deactivated, it allows you to listen not loudly, to hear people whispering without waking up everybody when there is a shot, but of course, sound "is pumping" (it's audible on music DVDs).
 Encoding options
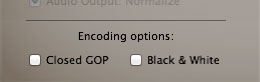
- Closed GOP: mpeg2 (DVD video format) is composed of "Groups Of Pictures" lasting around half a second. Each GOP is composed of a whole frame (a kind of jpeg image) and of algorithms indicating how this "jpeg" image will modify itself during the incoming half second. Closing GOPs means making each GOP totally independent from the former one and from the further one. Leaving them open means making each GOP dependant on the former one. You didn't understood this? You have no interest with the matter? …don't worry. Don't check this box ;-)
- Black & White: your source file is in Black & White (like on old movie), but it begins to "faint", to show "some coloured blurs". Check this option to remove every colours remaining.